
 简体中文
简体中文Win11 WSL安装并使用docker


在Windows中安装配置WSL Ubuntu并使用docker的过程中,遇到一些问题:
- 安装WSL会遇到错误代码
- WSL1还是WSL2?
- WSL的网络代理如何设置?
- WSL的
systemctl不见了? - docker-daemon启动失败?
- docker拉取镜像超时?
本文记录了这些遇到的问题,并提供了可行的解决办法。
安装WSL Ubuntu遇到的错误 #
安装过程很简单,在microsoft store里直接安装,这里选择的版本是22.04.5 LTS,安装完成后,Windows Terminal会自动添加配置终端配置,直接打开即可。
不过,首次安装,很可能会遇到一些错误代码...
1. 0x8007019e #
该错误代码原因:未安装子系统支持。
管理员打开命令行,运行如下命令:
1Enable-WindowsOptionalFeature -Online -FeatureName Microsoft-Windows-Subsystem-Linux
按照提示,重启电脑。
2. 0x800701bc #
该错误代码原因:没有升级对应wsl2的内核。
下载插件( wsl_update_x64.msi),安装后即可成功。
3. 0x80370102 #
该错误代码原因:没有开启虚拟化。
在控制面板-->程序和功能 --> 启用或关闭 windows 功能 中,找到虚拟机平台,勾选上安装并重启。
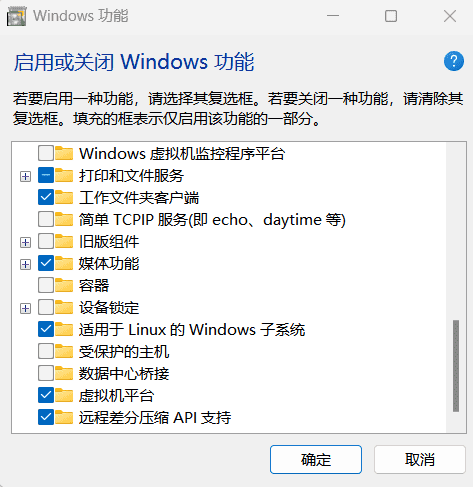
开启Windows的虚拟化功能
WSL配置走宿主代理 #
安装完成WSL后,默认配置下,网络是正常的。在docker拉取镜像的时候,发现连接超时。想到了可能需要走代理。
问题接着就出现了,WSL无法ping通宿主机~
首先需要解决这个问题。
在PowerShell和WSL分别运行ipconfg和ifconfig命令,查看宿主机和WSL的ip:
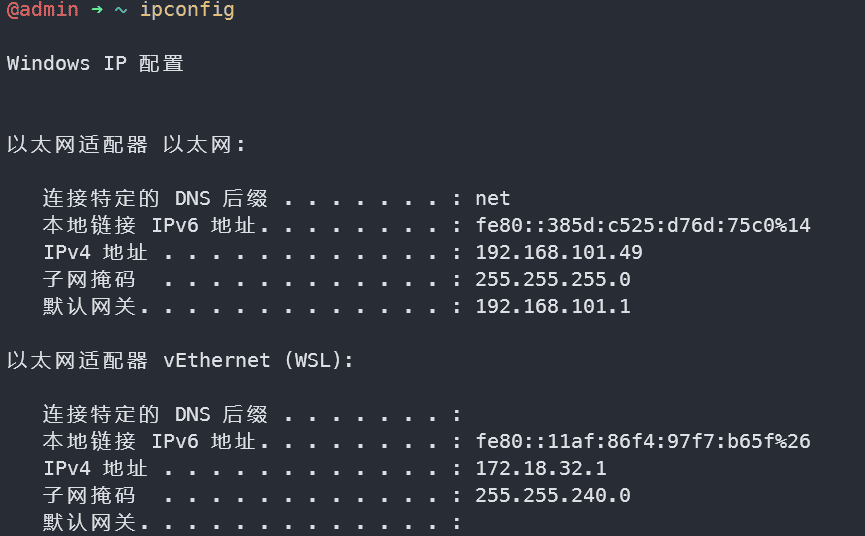
Windows宿主机的网络属性
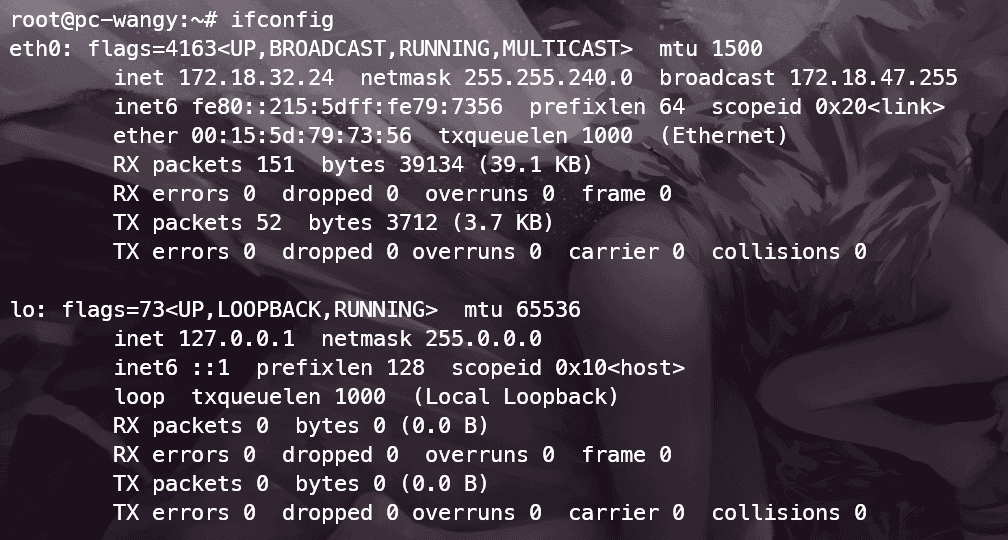
WSL的网络属性
在宿主机中运行ping 172.18.32.24通, 在WSL中运行ping 172.18.32.1不通。发现是Win防火墙的配置问题:
使用管理员权限运行PowerShell运行
1New-NetFirewallRule -DisplayName "WSL" -Direction Inbound -InterfaceAlias "vEthernet (WSL)" -Action Allow
即可。
接下来,就是让WSL走宿主机代理。
由于WSL的ip和宿主机的ip都是动态的,所以使用export http-proxy ...的方式配置.bashrc文件,每次ip变化都需要手动再配置一遍,推荐使用脚本获取上述2个ip
,再执行命令配置。方法参考
WSL2 中访问宿主机 Windows 的代理。
配置完成后,在WSL中运行proxy set即可开启代理。
然后运行curl www.google.com测试代理是否正常工作。
用上述方法设置的代理,可以正常工作。但是会引发2个问题:
WSL开机提示(
wsl --update之后出现): wsl: 检测到 localhost 代理配置,但未镜像到 WSL。NAT 模式下的 WSL 不支持 localhost 代理解决这个问题的方式是,换一个WSL的代理方式:即在宿主机的
C:\Users\<username>下创建一个.wslconfig文件,写入如下配置:[experimental] autoMemoryReclaim=gradual networkingMode=mirrored dnsTunneling=true firewall=true autoProxy=true然后关闭WSL再重启。
docker代理问题:Handler for GET /v1.47/images/search returned error: Get "https://index.docker.io/v1/search?q=mysql&n=25": dial tcp 31.13.69.245:443: connect: connection refused
docker的问题在WSL的代理问题处理完成之后,docker正确配置代理即可解决了。
WSL启用systemctl #
WSL 0.67.6+之后,支持systemctl了。
首先运行wsl -version检查电脑所使用的WSL版本:
1```cmd
2WSL 版本: 2.3.24.0
3内核版本: 5.15.153.1-2
4WSLg 版本: 1.0.65
5MSRDC 版本: 1.2.5620
6Direct3D 版本: 1.611.1-81528511
7DXCore 版本: 10.0.26100.1-240331-1435.ge-release
8Windows 版本: 10.0.22631.4317
如果WSL版本过低,使用wsl --update更新WSL。
按照
指导,配置WSL中的/etc/wsl.conf文件后重启WSL即可。
实际上,高版本的WSL配置文件
/etc/wsl.conf已经存在了。尽管如此,我的Win11还是运行wsl --update之后才正常使用systemctl。
配置Ubuntu镜像源 #
按照经验,Ubuntu一般会选择国内的镜像站点来安装软件。
简单一点,使用 清华大学镜像站来配置软件仓库。
比较简单,就不详细叙述了。
WSL安装docker engine #
既然使用WSL了,就不要在Win上安装docker desktop了吧。
按照 官网教程安装docker engine。
docker daemon 无法启动 #
安装完成后,运行docker run hello-world出现错误提示:
1```shell
2docker: Cannot connect to the Docker daemon at unix:///var/run/docker.sock.
3Is the docker daemon running?.
4See 'docker run --help'.
WSL 无法使用。systemctl命令WSL 0.67.6+ 版本才能启用 systemd。参考:https://learn.microsoft.com/zh-cn/windows/wsl/wsl-config
发现docker服务并没有启动。使用service docker start尝试启动服务,再次运行还是失败。使用cat var/log/docker.log查看docker日志:
1```shell
2level=warning msg="Controller.NewNetwork bridge:" error="failed to add the RETURN rule for DOCKER-USER
3IPV6: unable to add return rule in DOCKER-USER chain:
4(iptables failed: ip6tables --wait -A DOCKER-USER -j RETURN: ip6tables v1.8.7 (nf_tables):
5RULE_APPEND failed (No such file or directory): rule in chain DOCKER-USER\n (exit status 4))
这个问题是iptables导致的,Ubuntu 20.10之后使用nftables,而要使用nftables,Linux kernel版本要高于5.8,而WSL使用的版本是5.4。
运行update-alternatives --config iptables将WSL使用的iptables版本更换为iptables-legacy就可以了。
实际上,win11的WSL2 Ubuntu 22.04.5 LTS kernel版本已经是5.10.16了,还是会存在这个问题。win也在
摆烂?
无法拉取镜像 #
WSL配置完代理之后,执行docker run hello-world依然报错:
1root@pc-wangy:~# docker run hello-world
2```shell
3root@pc-wangy:~# docker run hello-world
4Error response from daemon: Get "https://index.docker.io/v1/search?q=mysql&n=25": dial tcp 192.133.77.59:443: i/o timeout
想了想,可能是docker并没有走代理:于是开始配置docker的代理了。
创建docker daemon的配置文件夹及文件:
1sudo mkdir -p /etc/systemd/system/docker.service.d
2sudo vim /etc/systemd/system/docker.service.d/http-proxy.conf
写入如下配置:
[Service]
Environment="HTTP_PROXY=http://127.0.0.1:7890"
Environment="HTTPS_PROXY=http://127.0.0.1:7890"
接着运行如下命令:
1systemctl daemon-reload
2system restart docker
WSL2 已经支持systemctl啦!
接着使用docker info检验docker daemon的配置:
 1 Kernel Version: 5.15.153.1-microsoft-standard-WSL2
 2 Operating System: Ubuntu 22.04.5 LTS
 3 OSType: linux
 4 Architecture: x86_64
 5 CPUs: 8
 6 Total Memory: 7.76GiB
 7 Name: pc-wangy
 8 ID: 124fe023-2684-4e51-87bb-76261f0974c5
 9 Docker Root Dir: /var/lib/docker
10 Debug Mode: false
11 HTTP Proxy: http://127.0.0.1:7890
12 HTTPS Proxy: http://127.0.0.1:7890
13 Experimental: false
14 Insecure Registries:
15  127.0.0.0/8
16 Live Restore Enabled: false
这样,docker就可以走代理了。
接下来,运行docker run hello-world来验证一下:
 1root@pc-wangy:~# docker run hello-world
 2
 3Hello from Docker!
 4This message shows that your installation appears to be working correctly.
 5
 6To generate this message, Docker took the following steps:
 7 1. The Docker client contacted the Docker daemon.
 8 2. The Docker daemon pulled the "hello-world" image from the Docker Hub.
 9    (amd64)
10 3. The Docker daemon created a new container from that image which runs the
11    executable that produces the output you are currently reading.
12 4. The Docker daemon streamed that output to the Docker client, which sent it
13    to your terminal.
14
15To try something more ambitious, you can run an Ubuntu container with:
16 $ docker run -it ubuntu bash
17
18Share images, automate workflows, and more with a free Docker ID:
19 https://hub.docker.com/
20
21For more examples and ideas, visit:
22 https://docs.docker.com/get-started/
本文完。
References #
- WSL安装问题: https://www.jeremyjone.com/933/
- 清华大学镜像站: https://mirrors.tuna.tsinghua.edu.cn/help/ubuntu/
- Install docker engine: https://docs.docker.com/engine/install/ubuntu/
- Docker daemon not running: https://patrickwu.space/2021/03/09/wsl-solution-to-native-docker-daemon-not-starting/
- Docker daemon issue on WSL: https://askubuntu.com/questions/1402272/cannot-connect-to-the-docker-daemon-when-running-docker-on-ubuntu-wsl
- WSL2 Ubuntu 21.04原生Docker无法运行的问题: https://www.ichenfu.com/2021/10/23/wsl2-ubuntu-dockerd-iptables-problem/
- WSL2-解决无法ping通主机/配置使用主机代理: https://blog.csdn.net/fur_pikachu/article/details/127973376
- WSL2 中访问宿主机 Windows 的代理:https://zinglix.xyz/2020/04/18/wsl2-proxy/
- WSL使用systemctl:https://learn.microsoft.com/zh-cn/windows/wsl/wsl-config
- NAT模式下的WSL不支持localhost代理? https://www.cnblogs.com/hg479/p/17869109.html
- Docker daemon proxy configuration: https://docs.docker.com/engine/daemon/proxy/#systemd-unit-file
- Docker CLI proxy configuration:https://docs.docker.com/engine/cli/proxy/
- 使用 WSL 访问网络应用程序: https://learn.microsoft.com/zh-cn/windows/wsl/networking
- WSL中的高级配置.wslconfig: https://learn.microsoft.com/zh-cn/windows/wsl/wsl-config#configuration-settings-for-wslconfig