
 简体中文
简体中文ScheduledExecutorService(二)


引例 #
前文介绍了ScheduledFutureTask和DeleyedWorkQueue这么多,都是为了更好地理解任务执行的流程,在这之前,我们不妨先看如下示例:
 1public class TestScheduledPoolExecutor {
 2
 3    private AtomicInteger sequence = new AtomicInteger(0);
 4
 5    private ScheduledThreadPoolExecutor service;
 6
 7    public TestScheduledPoolExecutor(int poolSize) {
 8        this.service = new ScheduledThreadPoolExecutor(poolSize);
 9    }
10
11    private void s() {
12        System.out.println(Thread.currentThread() + " " + sequence.getAndIncrement());
13    }
14
15    private void c() {
16        System.out.println(Thread.currentThread() + " c running");
17        while (true) {
18            // never finish loop unless interrupted
19            if (Thread.interrupted()) {
20                break;
21            }
22        }
23        System.out.println(Thread.currentThread() + "c interrupted");
24    }
25
26    @SneakyThrows
27    void basicTest() {
28        service.schedule(this::s, 2, TimeUnit.SECONDS);
29        service.schedule(this::c, 1, TimeUnit.SECONDS);
30        // shutdown无法终止线程池
31        service.shutdown();
32        TimeUnit.SECONDS.sleep(5);
33        System.exit(0);
34    }
35
36    public static void main(String[] args) {
37        TestScheduledPoolExecutor ts = new TestScheduledPoolExecutor(0);
38        ts.basicTest();
39    }
40}
在上例中,我们创建了2个任务s和c,前者简单地获取并递增sequence,后者则是一个响应中断的死循环。当我们使用不同数量的corePoolSize去运行任务时,得到的结果不一样:
当corePoolSize = 0时,输出为
    Thread[pool-1-thread-1,5,main] c running

当corePoolSize = 1时,输出为
    Thread[pool-1-thread-1,5,main] c running

当corePoolSize > 1时,输出为
    Thread[pool-1-thread-1,5,main] c running
    Thread[pool-1-thread-2,5,main] 1
这种差异驱使我们去探索计划任务的提交与执行方式。
提交任务 #
 1// 提交单次执行的任务
 2public ScheduledFuture<?> schedule(Runnable command,
 3                                  long delay,
 4                                  TimeUnit unit) {
 5   if (command == null || unit == null)
 6       throw new NullPointerException();
 7   // t = new ScheduledFutureTask(..)
 8   RunnableScheduledFuture<?> t = decorateTask(command,
 9       new ScheduledFutureTask<Void>(command, null,
10                                     triggerTime(delay, unit)));
11   // 执行任务的核心方法
12   delayedExecute(t);
13   return t;
14}
15
16// 提交周期执行的任务
17public ScheduledFuture<?> scheduleWithFixedDelay(Runnable command,
18                                                 long initialDelay,
19                                                 long delay,
20                                                 TimeUnit unit) {
21    if (command == null || unit == null)
22        throw new NullPointerException();
23    if (delay <= 0)
24        throw new IllegalArgumentException();
25    ScheduledFutureTask<Void> sft =
26        new ScheduledFutureTask<Void>(command,
27                                      null,
28                                      triggerTime(initialDelay, unit),
29                                      unit.toNanos(-delay));
30    // t = sft
31    RunnableScheduledFuture<Void> t = decorateTask(command, sft);
32    // 任务执行后将再次入队
33    sft.outerTask = t;
34    delayedExecute(t);
35    return t;
36}
37
38private void delayedExecute(RunnableScheduledFuture<?> task) {
39   if (isShutdown())
40        // ctl > running,不接受任务提交
41       reject(task);
42   else {
43       // 非空任务入队
44       super.getQueue().add(task);
45       // double check
46       if (isShutdown() &&
47           !canRunInCurrentRunState(task.isPeriodic()) &&
48           remove(task))
49           // 如果任务入队之后,线程池关闭
50           // 且关闭策略不允许关闭之后继续执行
51           // 且任务从队列中移除
52           // 则取消任务
53           task.cancel(false);
54       else
55           // add worker
56           ensurePrestart();
57   }
58}
59
60// 此方法保证了即使corePoolSize = 0的情况下也创建worker
61void ensurePrestart() {
62    // 获取当前工作线程数
63    int wc = workerCountOf(ctl.get());
64    if (wc < corePoolSize)
65        // 尚可以新建核心线程
66        addWorker(null, true);
67    else if (wc == 0)
68        // 新建非核心线程
69        addWorker(null, false);
70}
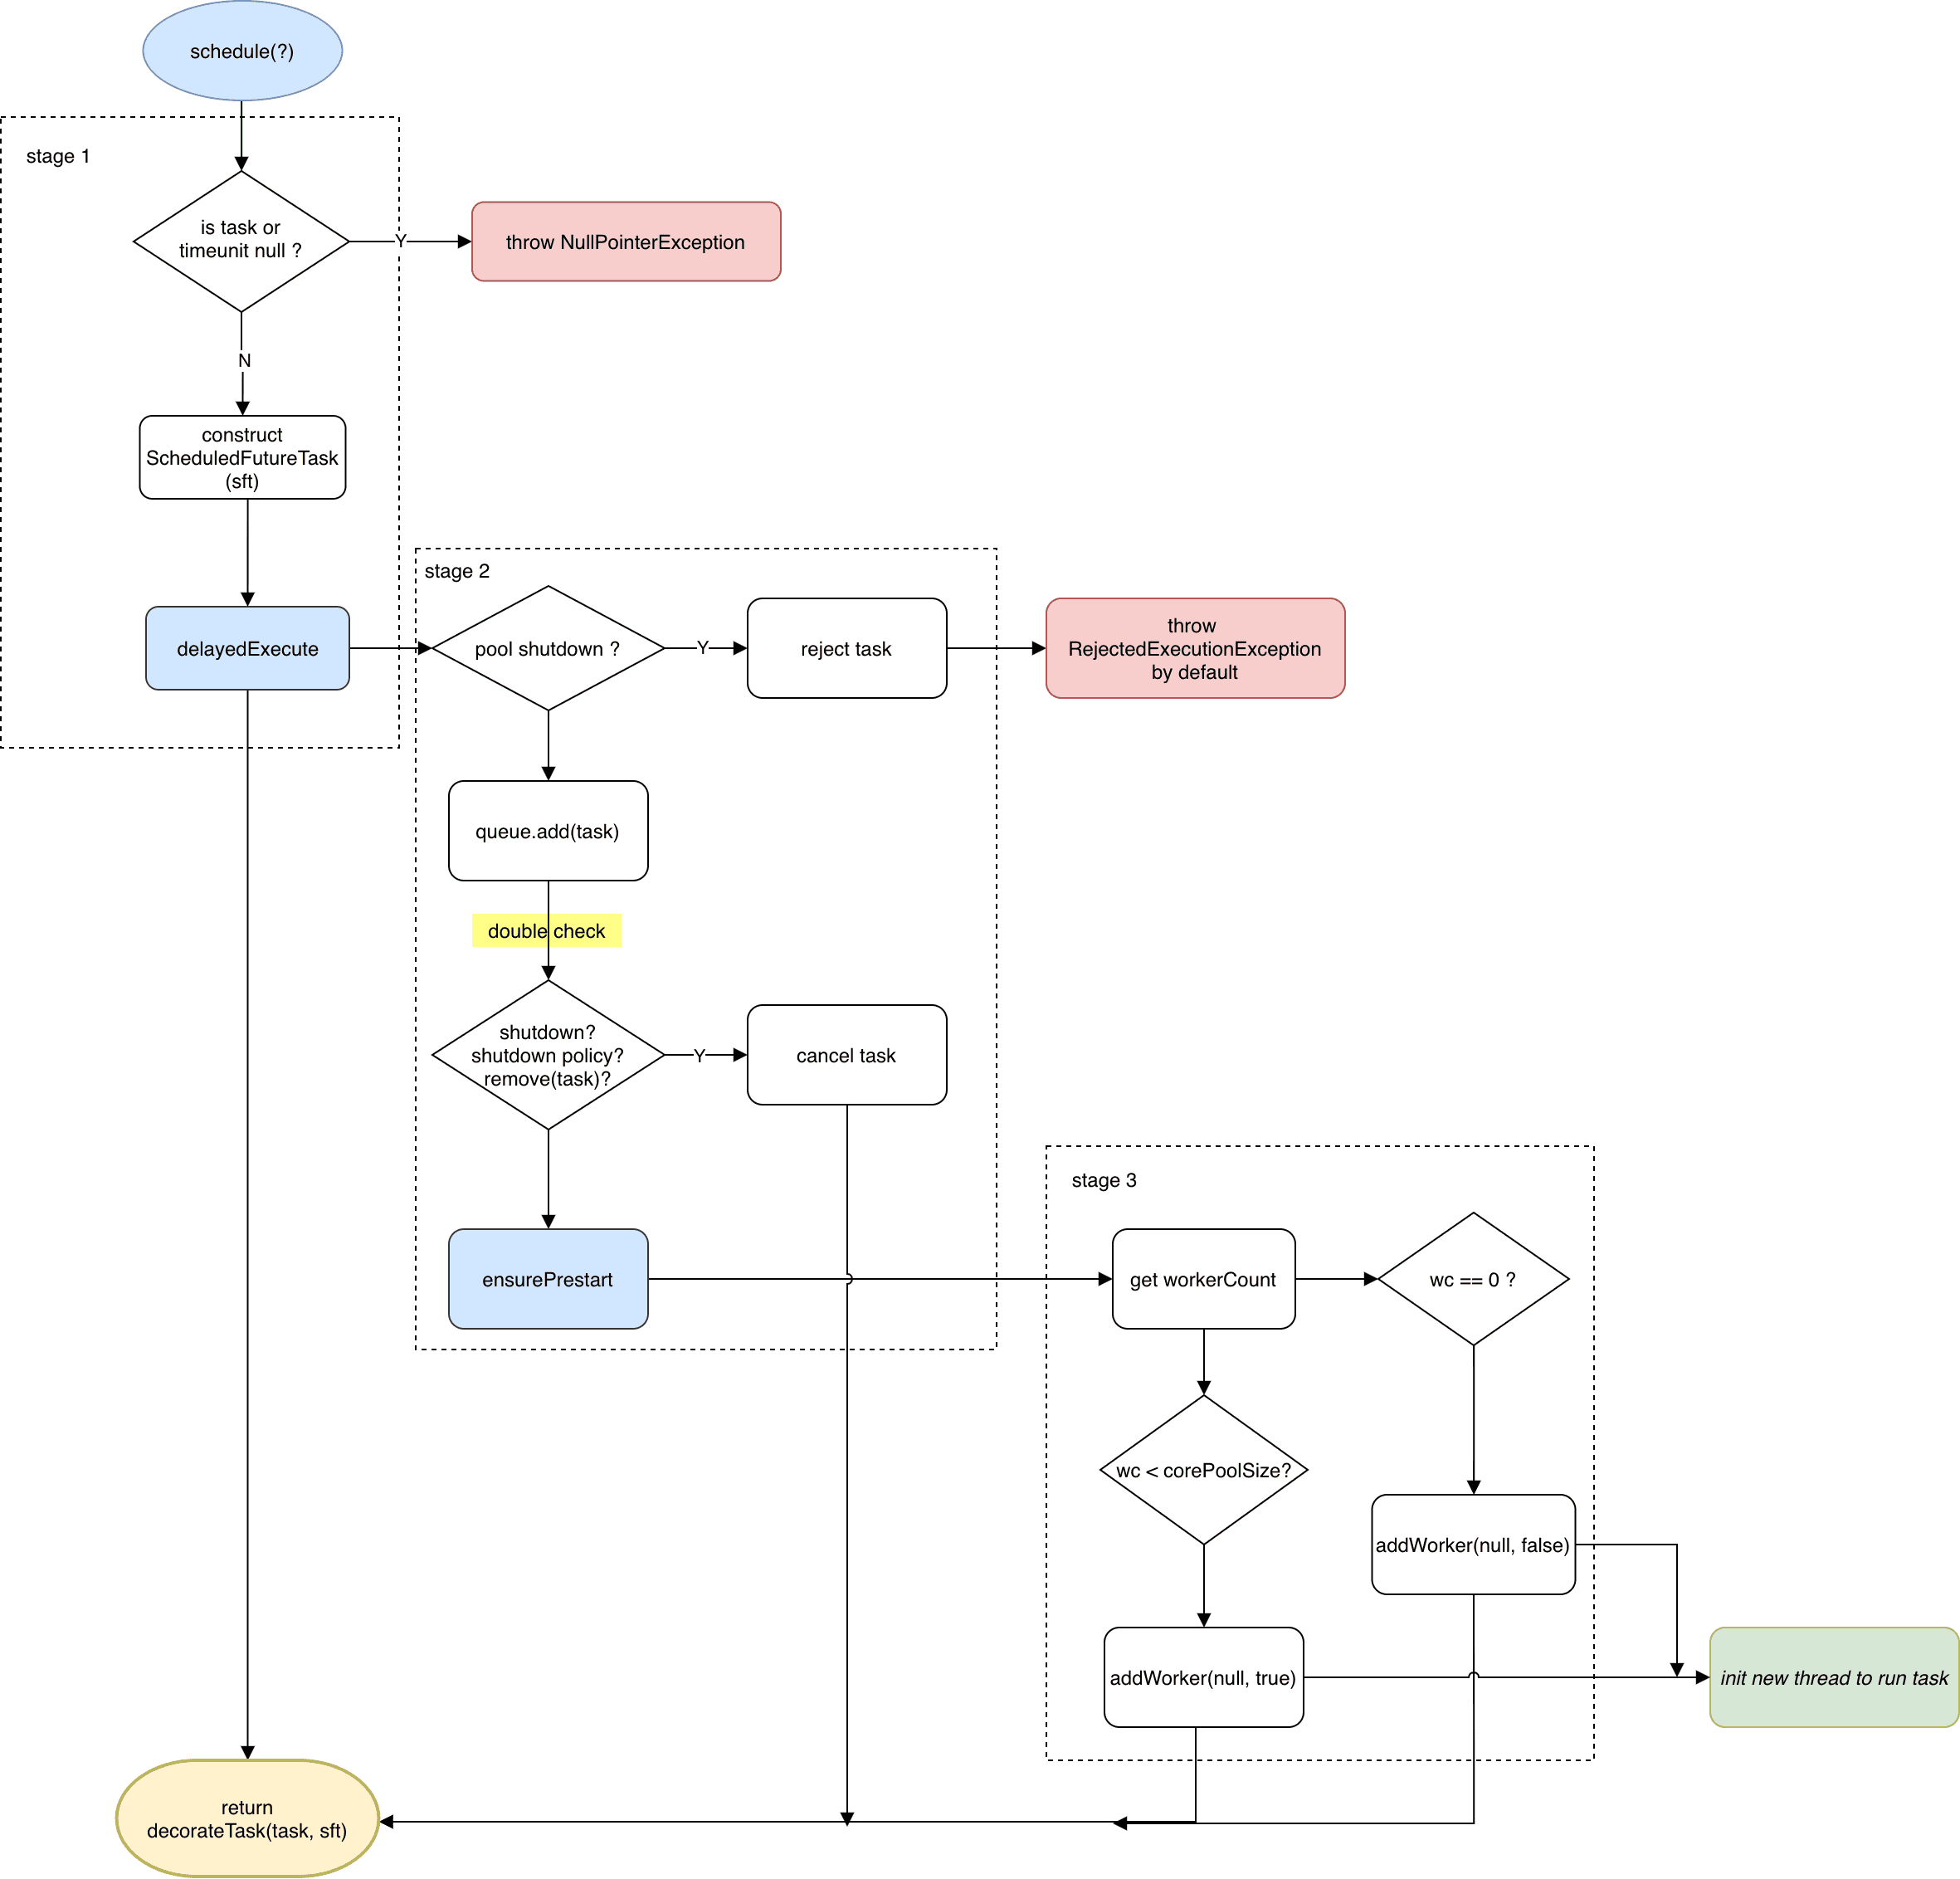
ScheduledThreadPoolExecutor任务提交流程图
我们可以从ScheduledThreadPoolExecutor的任务提交过程中总结几点规律:
- 任务一定是先放入任务队列中的
- 活动线程不可能超过核心线程池大小
- 若
corePoolSize> 0,则池中不可能存在非核心线程 - 非核心线程只有在
corePoolSize= 0且当前工作线程数为0时才可以创建,并且活动的非核心线程只能存在一个
上述规律的第4点容易得出线程池中非核心线程数至多为1的结论,这似乎是很合理的,因为想要创建非核心线程,wc必须为0。结合线程池的相关知识,我们知道非核心线程超时是会被销毁的,我们可以看看非核心线程在执行计划任务时的行为
 1@SneakyThrows
 2void howManyThreads() {
 3    for (; ; ) {
 4        ScheduledFuture<?> schedule =
 5            service.schedule(this::s, 0, TimeUnit.MILLISECONDS);
 6        // TimeUnit.MILLISECONDS.sleep(5); // uncomment this to create new worker
 7        for (; ; ) {
 8            if (schedule.isDone())
 9                break;
10        }
11        if (sequence.get() >= 10) {
12            schedule.cancel(false);
13            break;
14        }
15    }
16    System.out.println("largest pool size: " + service.getLargestPoolSize());
17    service.shutdown();
18}
19/* output(sample)
20Thread[pool-1-thread-1,5,main] 1
21Thread[pool-1-thread-1,5,main] 2
22Thread[pool-1-thread-1,5,main] 3
23Thread[pool-1-thread-2,5,main] 4
24Thread[pool-1-thread-3,5,main] 5
25Thread[pool-1-thread-4,5,main] 6
26Thread[pool-1-thread-5,5,main] 7
27Thread[pool-1-thread-7,5,main] 8
28Thread[pool-1-thread-8,5,main] 9
29Thread[pool-1-thread-10,5,main] 10
30largest pool size: 2
31*///:~
在上例中,我们保证当前提交的任务在执行完成之后再进行下一次提交,那么下一次的任务应该新建线程执行才对。但实际的情况并非如此,执行上个任务的线程仍然有机会继续执行接下来提交的任务,这是由于任务的执行以及线程的销毁都是耗时操作,可能在线程销毁(执行CP1)之前新的任务已经添加到队列中了。
除此之外,在所有任务执行完成之后,我们获取了线程池中同时执行任务的最大线程数,按照逻辑,这个值应该始终是1,实际的运行过程中却是一个不确定的数。这让人费解,新线程的创建前提是workerCount==0,即表明了池中是没有正在运行的线程,不过,可以猜测池中出现2个线程的过程大概出现在线程1即将销毁,执行
processWorkerExit方法之前,将要销毁的worker还未从set中移除,而此时addworker读取到的size > 1,于是出现了largestPoolSie>1的情形。
如果取消上例中的休眠注释,就能规避上述的各种不确定情况,足够时长的休眠可以保证执行任务的线程执行任务并销毁。
任务入队 #
由于任务提交之后一定是先放入任务队列的,而基于DelayedWorkQueue的任务队列和普通的阻塞队列有些区别。任务队列通过调用offer(Runnable x)方法将任务放入队列中,只有在获取锁的情况下才能调用
 1public boolean offer(Runnable x) {
 2    if (x == null)
 3        throw new NullPointerException();
 4    RunnableScheduledFuture<?> e = (RunnableScheduledFuture<?>)x;
 5    final ReentrantLock lock = this.lock;
 6    lock.lock();
 7    try {
 8        int i = size;
 9        if (i >= queue.length)
10            // 队列扩容 (grow 50%)
11            grow();
12        size = i + 1;
13        if (i == 0) {
14            queue[0] = e;
15            setIndex(e, 0);
16        } else {
17            siftUp(i, e);
18        }
19        // 入队之前,若队列为空,且没有线程在超时等待
20        if (queue[0] == e) {
21            leader = null;
22            // 唤醒等待的线程去获取任务执行(并非一定有线程等待)
23            available.signal();
24        }
25    } finally {
26        lock.unlock();
27    }
28    return true;
29}
由于使用无界队列实现,DelayedWorkQueue任务入队的阻塞不会阻塞;但如果入队时队列为空,那么意味着:
- 首个任务入队;
- 所有任务都已经出队;
成功入队之后,将会唤醒一个阻塞的线程(可能没有阻塞的线程)去获取任务执行。
执行任务 #
与ThreadPoolExecutor不同的是,ScheduledThreadPoolExecutor所有任务都是先添加到任务队列中的,并且任务队列是delay queue,从delay queue中取出任务比简单的阻塞队列稍显复杂。不过其执行任务的基本逻辑和
ThreadPoolExecutor的任务执行过程是一致的
而关于任务周期执行的机制,前文在阐述
ScheduledFutureTask的run()方法时,已经提及,
- 它调用 FutureTask.runAndReset方法执行任务,保证任务可以重复运行;
- 重新计算任务的下一次运行时间,并且将任务重新入队
任务出队 #
任务出队有主要两个方法,poll(long timeout)和take(),前者用于非核心线程,后者用于核心线程;同样地,只有在获取锁的时候才能出队
 1public RunnableScheduledFuture<?> take() throws InterruptedException {
 2    final ReentrantLock lock = this.lock;
 3    // 注意此处可以被中断
 4    lock.lockInterruptibly();
 5    try {
 6        // 循环执行
 7        for (;;) {
 8            // queue[0]是最先超时的任务
 9            RunnableScheduledFuture<?> first = queue[0];
10            if (first == null)
11                // 队列为空,无限期等待,会被offer()方法唤醒
12                available.await();
13            else {
14                long delay = first.getDelay(NANOSECONDS);
15                if (delay <= 0)
16                    // 任务已超时,返回该任务
17                    return finishPoll(first);
18                first = null; // don't retain ref while waiting
19                // 任务未超时
20                if (leader != null)
21                    // 当leader已设置时,当前线程只能无限期等待
22                    // 因为在其之前还有任务未执行
23                    available.await();
24                else {
25                    // 否则将leader设置为当前(执行任务的)线程
26                    Thread thisThread = Thread.currentThread();
27                    leader = thisThread;
28                    try {
29                        // 等待任务超时
30                        available.awaitNanos(delay);
31                    } finally {
32                        // 任务超时之后,将leader置空,再次进入循环
33                        // 之后将获取任务并返回
34                        // 此时其他的线程将可以设置leader并进入超时等待
35                        if (leader == thisThread)
36                            leader = null;
37                    }
38                }
39            }
40        }
41    } finally {
42        if (leader == null && queue[0] != null)
43            //唤醒其他的线程去获取任务
44            available.signal();
45        lock.unlock();
46    }
47}
48
49public RunnableScheduledFuture<?> poll(long timeout, TimeUnit unit)
50    throws InterruptedException {
51    // nanos如果不进行动态配置,就是0
52    long nanos = unit.toNanos(timeout);
53    final ReentrantLock lock = this.lock;
54    lock.lockInterruptibly();
55    try {
56        for (;;) {
57            RunnableScheduledFuture<?> first = queue[0];
58            if (first == null) {
59                if (nanos <= 0)
60                    // 若队列为空,且keepAliveTime<=0,直接返回null
61                    return null;
62                else
63                    // 否则限时等待之后进入下次循环
64                    nanos = available.awaitNanos(nanos);
65            } else {
66                long delay = first.getDelay(NANOSECONDS);
67                if (delay <= 0)
68                    // 运气好正好有任务到期,返回任务
69                    return finishPoll(first);
70                if (nanos <= 0)
71                    // 任务未到期且keepAliveTime<=0,返回null
72                    return null;
73                first = null; // don't retain ref while waiting
74                // 以下是设置keepAliveTime的情形
75                if (nanos < delay || leader != null)
76                    // 将nanos置0
77                    nanos = available.awaitNanos(nanos);
78                else {
79                    Thread thisThread = Thread.currentThread();
80                    leader = thisThread;
81                    try {
82                        // 分段等待
83                        long timeLeft = available.awaitNanos(delay);
84                        nanos -= delay - timeLeft;
85                    } finally {
86                        // 重重leader
87                        if (leader == thisThread)
88                            leader = null;
89                    }
90                }
91            }
92        }
93    } finally {
94        if (leader == null && queue[0] != null)
95            // 唤醒其他线程
96            available.signal();
97        lock.unlock();
98    }
99}
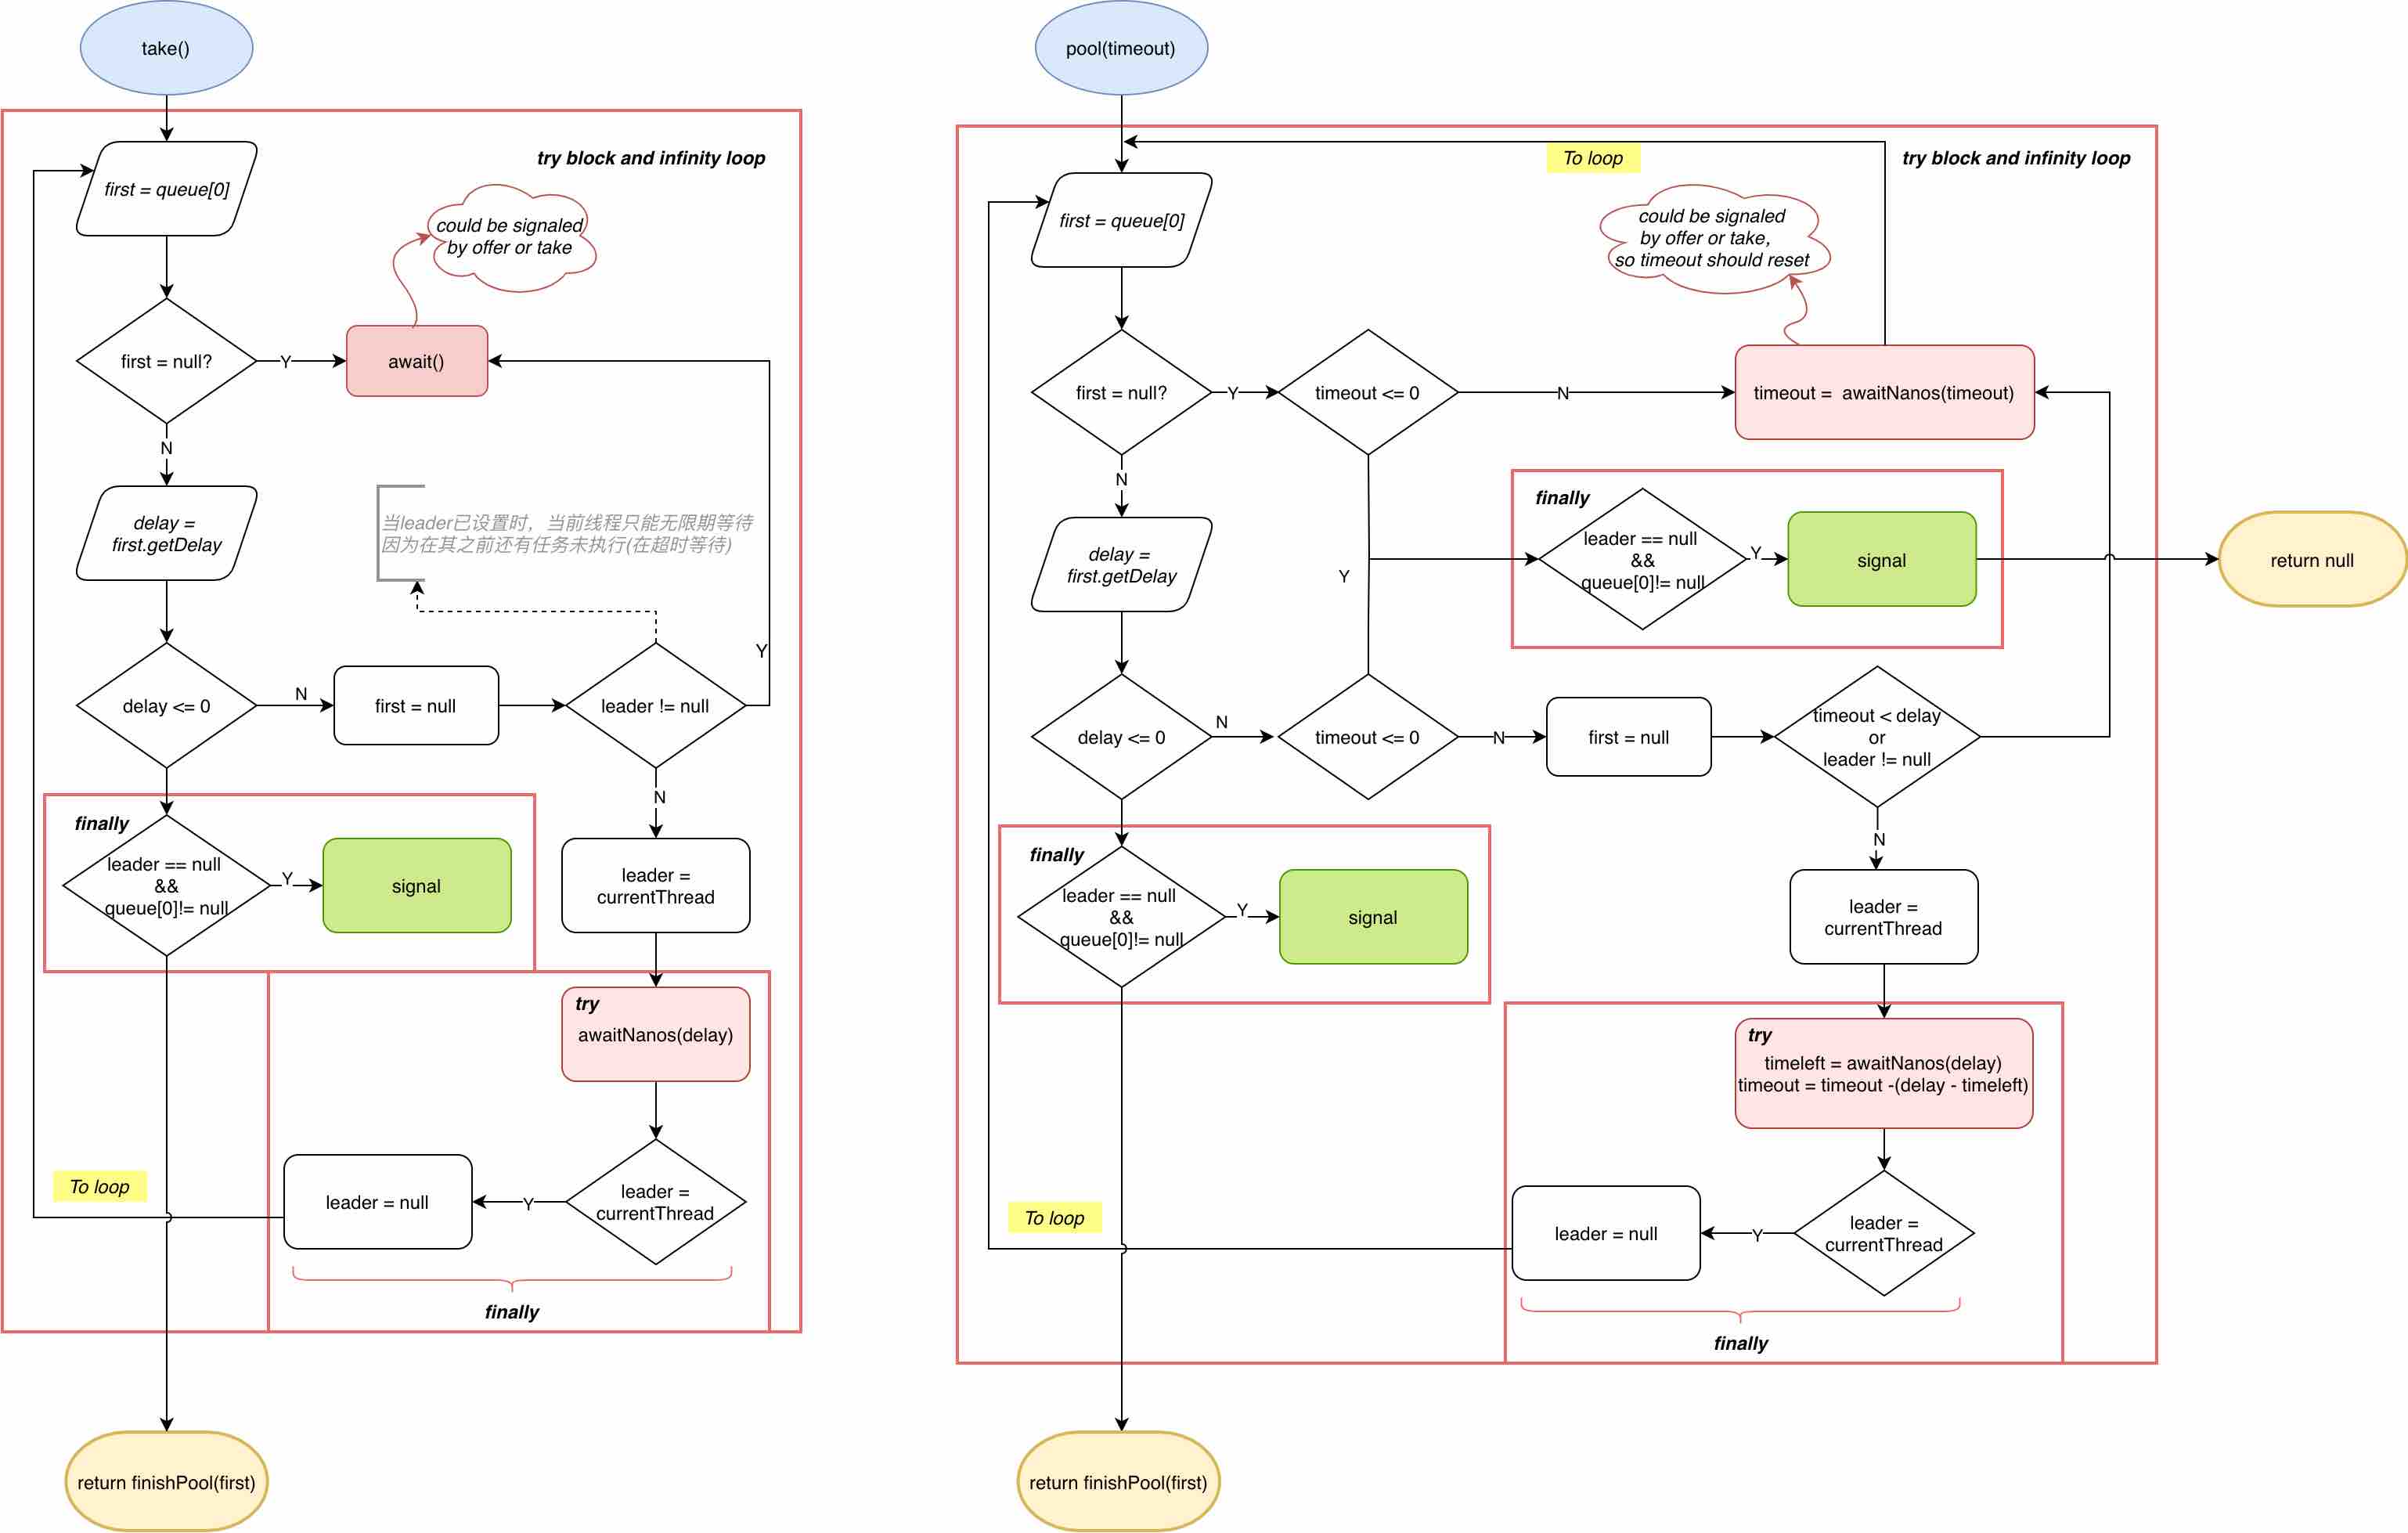
ScheduledThreadPoolExecutor任务出队流程图
理解了任务的入队与出队,我们就可以解释
本节开头示例中不同corePoolSize引发的差异:
在分析任务的执行时,要始终留意getTask()方法中的这一段代码,为了方便描述,将其记为CP1
1if ((wc > maximumPoolSize || (timed && timedOut))
2    && (wc > 1 || workQueue.isEmpty())) {
3    if (compareAndDecrementWorkerCount(c))
4        return null;
5    continue;
6}
当
corePoolSize为0时- 首次提交一个延迟2s的任务a,创建线程t1,显然a超时之前t1无法获取任务,但t1并不会因为keepAlive超时而在CP1处被结束(因为任务队列不为空),它只是一直在循环;
- 接着提交一个延迟1s的任务b,由于t1未被销毁,所以提交任务b时并未新建线程,池中仍只有一个工作线程t1;
- 任务b会先于a出队,故1s后b超时执行,由于b是死循环,无法结束,因此没有线程去执行超时的任务a
当
corePoolSize为1时,虽然输出结果与corePoolSize为0时一致,但是其执行过程却有很大差别- 首次提交一个延迟2s的任务a,创建线程t1,t1会在take()获取队列时设置
leader并进入超时等待状态; - 接着提交一个延迟1s的任务b,由于
corePoolSize的限制,并未能创建新线程,池中仍只有一个工作线程t1。在任务b入队后,会唤醒阻塞的t1线程; - t1被唤醒之后清空
leader,重新去队列中获取任务,由于b要比a先出队,此时t1会接着设置leader并在任务b的时间上超时等待; - 任务b超时之后开始执行,由于b是死循环,无法结束,因此没有线程去执行超时的任务a
- 首次提交一个延迟2s的任务a,创建线程t1,t1会在take()获取队列时设置
当
corePoolSize> 1时,情况又有所不同- 首次提交一个延迟2s的任务a,创建线程t1,t1会在take()获取队列时设置
leader并进入超时等待状态; - 接着提交一个延迟1s的任务b,创建线程t2,池中有2个工作线程t1、t2。同样地,b入队后,会唤醒阻塞的t1;
- t1被唤醒之后清空
leader,重新去队列中获取任务,由于b要比a先出队,此时t1会接着设置leader并在任务b的时间上超时等待; - t1在超时等待时,由于
leader已经被设置,t2只能无限阻塞; - t1超时后,执行任务b,同时清空
leader并唤醒t2,t2设置leader并在任务a的时间上超时等待; - t2超时后,执行任务a
- 首次提交一个延迟2s的任务a,创建线程t1,t1会在take()获取队列时设置